前言
继前一篇介绍了android编译aapt的工具之后,可能会困惑我为什么会花一大篇文章去写一个工具怎么用,在这第二篇文章我就详细分析 ADT是怎么使用aapt来编译android资源的.
ADT编译资源
我们用原生语言java编写android程序的时候,我们仅仅需要负责编写代码 配置权限参数的工作,而编译资源 编译代码 打包apk 全部交给eclipse或者交给androidSDK的工具代劳,同样我们编写AIR for android程序也是如此 我们仅仅编写代码 其他工作都一般交给FB代劳,而FB又交给ADT代劳,而ADT则指挥android SDK的各种工具工作,这编译资源 便是 从 完成代码之后的第一步工作.下面我们看看ADT是如此操作aapt实现编译android资源的.
1.前期目录申请 文件定位
[code lang=”java”]
//获取本机aapt工具路径
String pathToApptTool = getAapt().getPath();
//若不存在则报错 若要引发此错误很简单,把你AIR SDK上的aapt删掉便可
if (!new File(pathToApptTool).exists()) {
throw new SDKDamagedException(pathToApptTool);
}
//申请临时文件夹
File tempDir = Utils.createTempDirectory(this.OsTempDir);
tempDir.deleteOnExit();
//根据之前取得的-app.xml的参数信息创建androidManiFest.xml文件
File androidManifestXmlFile = createAndroidManifestXml(packageName, descriptor, appVersionCode, tempDir);
if (!androidManifestXmlFile.exists()) {
new IOException("Unable to create AndroidManifest.");
}
//获取目录绝对路径 用来存放R.java文件
//编译资源的结果会生成R.java
//这点在上一篇的命令中已经验证
String destDirForRJavaFile = tempDir.getCanonicalPath();
//获取绝对路径,用来存放R.java编译后的R.class
//所有*.java源码都会被编译成*.class
String destDirForRJavaClasses = tempDir.getCanonicalPath();
//新建android资源文件
File appEntryResources = editAppEntryResources(descriptor, tempDir);
//新建运行时资源文件 若FB中勾选了运行时 则会使用到
File captiveRuntimeResources = copySupportedLanguagesResources(new File(Utils.getSDKLibDir(), "android/lib/resources/captive_runtime/res"), tempDir, "captive_runtime_res");
//定位android.jar 上一篇说了aapt编译需要指出android.jar文件
File androidResJar = new File(Utils.getSDKLibDir(), "android/lib/resources/android-res.jar");
//新建文件 用于编译后的输出
File apkFileToOutput = new File(tempDir, "resources.apk");
//若添加运行时 则会操作runtime.apk文件
if ((hasCaptiveRuntime()) && (!captiveRuntimeResources.exists()))
throw new SDKDamagedException(captiveRuntimeResources.getPath());
if (!androidResJar.exists()) {
throw new SDKDamagedException(androidResJar.getPath());
}
[/code]
2.组合aapt命令 用于编译
[code lang=”java”]
//申请List用于存放命令
List aaptCommand = new LinkedList();
//aapt
aaptCommand.add(pathToApptTool);
//编译资源头命令
aaptCommand.add("package");
//强制资源国际化
aaptCommand.add("-z");
//更新现有的包 u = update;
aaptCommand.add("-u");
//指定R.java输出的路径
aaptCommand.add("-J");
aaptCommand.add(destDirForRJavaFile);
//AndroidManifest.xml的路径;
aaptCommand.add("-M");
aaptCommand.add(androidManifestXmlFile.getPath());
//指定资源目录 一般是 res
aaptCommand.add("-S");
aaptCommand.add(appEntryResources.getPath());
//若打包运行时 则增加运行时资源
boolean needsAutoAddOverlayArg = false;
if (hasCaptiveRuntime())
{
aaptCommand.add("-S");
aaptCommand.add(captiveRuntimeResources.getPath());
needsAutoAddOverlayArg = true;
}
//自动添加资源覆盖
if (this.m_extraResourceDirectories != null) {
Iterator i = this.m_extraResourceDirectories.iterator();
while (i.hasNext())
{
aaptCommand.add("-S");
aaptCommand.add(i.next());
needsAutoAddOverlayArg = true;
}
}
if (needsAutoAddOverlayArg)
{
aaptCommand.add("–auto-add-overlay");
}
aaptCommand.add("-I");
aaptCommand.add(androidResJar.getPath());
aaptCommand.add("–min-sdk-version");
aaptCommand.add("8");
aaptCommand.add("–target-sdk-version");
aaptCommand.add("14");
aaptCommand.add("–version-code");
aaptCommand.add(Integer.toString(appVersionCode));
aaptCommand.add("–version-name");
aaptCommand.add(descriptor.versionLabel());
aaptCommand.add("-F");
aaptCommand.add(apkFileToOutput.getPath());
[/code]
经过上一段代码组合后,我们大体能分析出ADT调用aapt编译android项目的资源后的命令行如下:
[code lang=”java”]
aapt package -z -u
-J javaFilePath
-M androidMainfast.xml
-S appResourcePath
-S runtimeAsset
-S otherAsset
-I path/android.jar
–min-sdk-version 8
–target-sdk-version 14
–version-code xxxx//-app.xml中的versionNumber
–version-name xxxx//-app.xml中的versionLabel
-F outPath //输出文件夹
[/code]
3.调用aapt编译
[code lang=”java”]
//输出字符串,用来存放aapt错误信息 若有的话
String aaptOutputString = null;
try {
//新建builder
ProcessBuilder pb = new ProcessBuilder(aaptCommand);
Process p = pb.start();
ByteArrayOutputStream aaptOutput = new ByteArrayOutputStream();
//指定错误信息输出
new Utils.OutputEater(p.getErrorStream(), aaptOutput).start();
new Utils.OutputEater(p.getInputStream()).start();
//开始编译 等待返回 这里类似我们AS3调用cmd操作各种命令 大概这意思
p.waitFor();
if (p.exitValue() != 0)
//若失败 则输出到字符串 ps:0表示成功
aaptOutputString = new String(aaptOutput.toByteArray(), "UTF-8");
}
catch (Exception e)
{
throw new IOException("Unable to run aapt");
}
if (aaptOutputString != null)
{
//注意:aapt tool failed 请问你打包APK出错的时候是不是非常常见?
//不信可以看下图
throw new ADTException("aapt tool failed:" + aaptOutputString.toString(), 17);
}
//新建R.java文件
File rJavaFile = new File(destDirForRJavaFile, "R.java");
if (!rJavaFile.exists())
throw new IOException("could not generate an R.java file.");
//把R.java编译成jar文件
File resourceJarFile = ResourceBytecodeGenerator.generateFromRFile(rJavaFile, new File(destDirForRJavaClasses));
if (!resourceJarFile.exists())
throw new IOException("could not generate bytecode for R.java class.");
if (!apkFileToOutput.exists()) {
throw new IOException("could not generate a resource apk.");
}
//编译资源结束 存好 resource.jar apk
this.m_resourceJar = resourceJarFile;
this.m_resourceApk = apkFileToOutput;
[/code]
附图一张,相信这个图在你编写ANE打包进去APK的时候肯定遇到过:
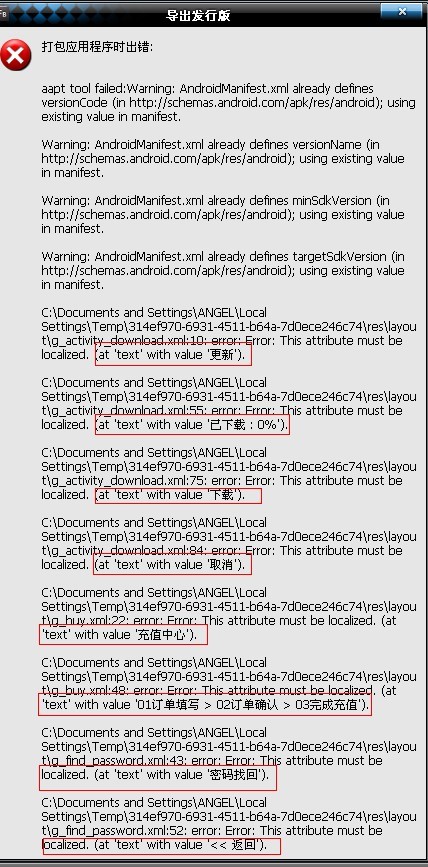
aapt tool failed 有没看到??看完这篇文章 你应该能理解这个错误信息的根源了.
案例地址
Anti-ADT:https://github.com/recter/Anti-ADT